Introduction
If you’re dreaming of a comfortable, energy-smart home, understanding the impact of thermalbridge issues and how to avoid spray foam installation mistakes is critical. Spray foam insulation can make a world of difference—if installed correctly. At White Knight Contracting, we’ve seen firsthand how proper knowledge and technique can eliminate common foam errors and help you enjoy your space all year long. Let’s explore the journey of spray foam and the simple steps that lead to flawless results!
Table of Contents
- A Brief History of Spray Foam Insulation
- Latest Trends and Innovations in Spray Foam
- Understanding Common Installation Mistakes
- Step-by-Step Guide: What a Proper Install Should Look Like
- Professional Spray Foam Tips & Quality Control Coaching
- Looking Ahead: Spray Foam and Future Prospects
- Interesting FAQ
- FAQs
A Brief History of Spray Foam Insulation
Spray foam has been around since the 1940s but wasn’t widely used in home construction until the 1980s. Originally developed for aircraft, the blend of chemicals used in spray foam made its way into North American attics and walls as builders searched for higher energy efficiency. The foam’s unique ability to expand and seal—even around tricky shapes—created a revolution in tackling thermalbridge problems in homes and businesses alike. By closing off those energy-leaking gaps, early adopters saw their comfort soar and energy bills shrink.
Latest Trends and Innovations in Spray Foam
Today, spray foam products are safer and more effective than ever. Innovations include:
- Low-VOC and eco-friendly formulas for healthier indoor air
- Smart mixes that better stop moisture and mold growth
- Advanced application tools for more precise coverage, especially at edges where thermalbridge losses are common
As energy codes become stricter, more homeowners are choosing spray foam to pass inspections and improve resale values. The trend is clear: people want insulation that goes the extra mile—not just any basic blanket solution.
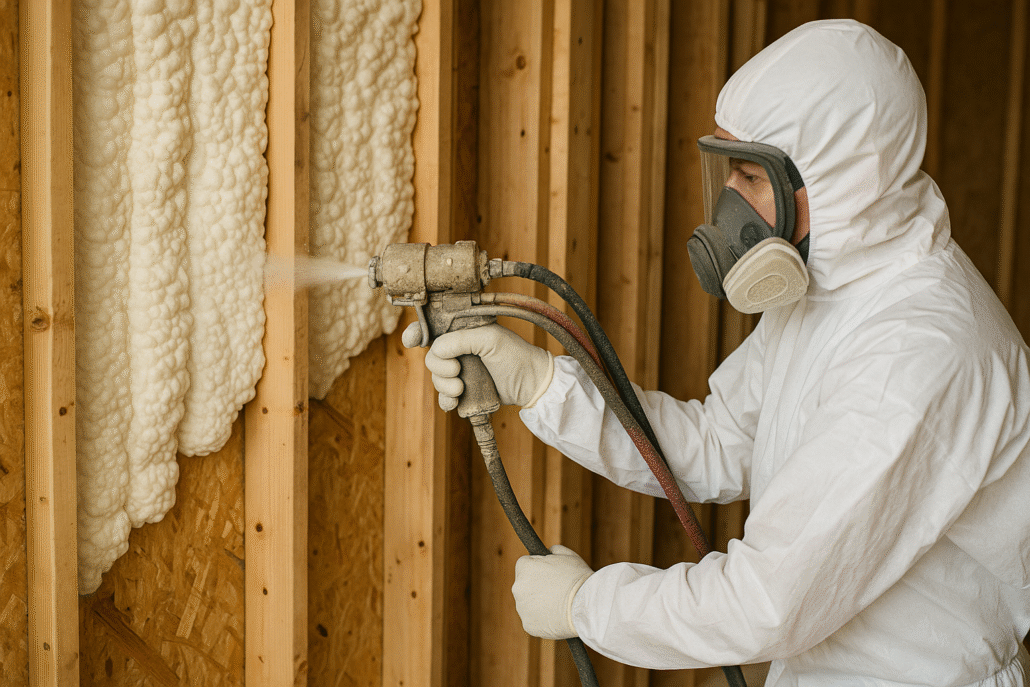
Understanding Common Installation Mistakes
The benefits of spray foam are clear—but only if you sidestep the most frequent installation mistakes. Here are some classic pitfalls:
- Failing to address thermalbridge leaks around framing, floors, and roof penetrations
- Poor mixing, which leads to uneven or sticky foam
- Rushing the job, causing gaps and cold spots
- Applying foam to dirty, icy, or damp surfaces (so it doesn’t stick)
- Spraying too thick, which creates unsafe or shrunken layers
- Not controlling ventilation, allowing fumes or excess moisture to linger
Many of these common foam errors happen when folks try a DIY route or hire poorly trained crews. The quickest way to wreck your insulation investment is to overlook careful surface prep or skip the practice runs. Remember, a small mistake can lead to big headaches—and major energy loss—down the road.
Step-by-Step Guide: What a Proper Install Should Look Like
To avoid spray foam installation mistakes, follow these professional spray foam tips:
- Clear and clean the work surfaces thoroughly, removing dust, frost, and debris.
- Protect any surfaces you don’t want covered, including windows and mechanicals.
- Test the spray system (including temperature and mix) before starting wider coverage.
- Apply foam in thin, even layers—waiting for each to cure before adding more.
- Pay special attention to spaces where thermalbridge leaks might appear, such as along wall plates and rim joists.
- Inspect all areas for missed spots, unevenness, or thin “flash” coats.
- Finish with careful trimming and proper ventilation until all odors disappear.
Professional spray foam installers always double-check their work and can catch issues with quality control before they become permanent mistakes.
Professional Spray Foam Tips & Quality Control Coaching
The difference between an okay job and a great one comes down to quality control. Expert contractors rely on careful inspections and a few tricks of the trade:
- Thermal imaging cameras spot hidden gaps and “cold bridges” early on
- Moisture meters check that surfaces are dry enough for strong adhesion
- Trim tests guarantee foam density and expansion match manufacturer specs
- Ventilation strategies protect indoor air quality during and after the work
When you trust an experienced company, you gain insights that go beyond basic installation. Since 2011, White Knight Contracting has helped clients deal with spray foam and siding jobs without juggling multiple trades. That’s the peace of mind that comes with choosing the right partner from the start.
Looking Ahead: Spray Foam and Future Prospects
As Canadians become more aware of energy use (and the cost of comfort), demand for top-shelf insulation is booming. Expect the next wave of foam products to get even smarter—adjusting to humidity or controlling air quality in real time. Thermalbridge science is moving forward too, with new tools designed to spot and block heat loss at a micro level.
Homeowners who understand how to avoid spray foam installation mistakes today are in the best position to benefit from tomorrow’s technology. Whether renovating an older home or building new, attention to detail will set your insulation project apart—for comfort, savings, and peace of mind.
Interesting FAQ
Tiger Foam reviews the benefits of spray foam options for various building insulation needs.
FAQs
- What is a thermalbridge, and why does it matter?
A thermalbridge is any spot where heat escapes through the building envelope due to poor insulation or gaps. Effective spray foam blocks these, boosting comfort and savings. - How can I spot installation mistakes after the foam is done?
Look for spongy, sticky, or uneven areas. If rooms feel drafty or colder than expected, there may be missed gaps or thin layers. - Are all spray foams the same?
No. Different foams have unique expansion rates, uses, and safety requirements. Professional advice helps you pick what’s best for your home. - Can my contractor do siding, too?
Yes! We’ve been in business since 2011 and handle it all—insulation, siding, and more—so you don’t have to call multiple companies.
To learn more and view our other blogs, click here.


Leave a Reply
Want to join the discussion?Feel free to contribute!