Airtight Homes Need Spray Foam

Introduction

If you’ve ever had trouble with drafts creeping in around your rimjoist, it’s time to consider how airtight homes rely on spray foam insulation to keep out air infiltration and maximize energy conservation. Homeowners in Calgary and beyond are learning that traditional options don’t always cut it—especially in areas like the rimjoist, where leaks can undermine your comfort and spike your utility bills. White Knight Contracting understands these challenges and has solutions that go far beyond quick fixes.

Table of Contents

The Evolution of Airtight Homes and Spray Foam

Building methods have come a long way, but for much of the last century, homes were never truly airtight. Small gaps—especially around the rimjoist—let cold air sneak in and heat escape. This air infiltration led to higher energy bills and less comfortable living spaces. As awareness grew, so did technology. Modern spray foam insulation changed the game, offering a true foam seal that blocks leaks, drafts, and moisture better than ever.

Today, airtight homes are the standard builders strive for, ensuring energy conservation starts right at the source—your rimjoist. This new approach isn’t just a trend; it’s an essential shift as codes demand better performance and comfort becomes a priority for homeowners.

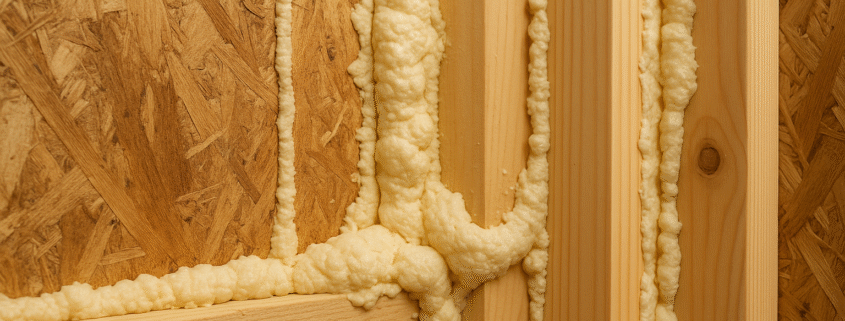
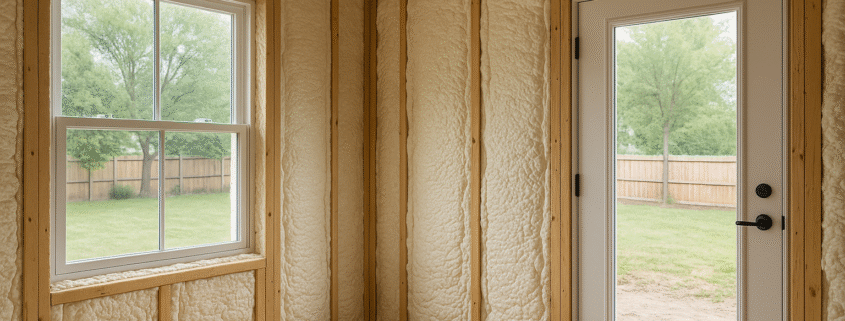
How Spray Foam Ensures an Airtight Rimjoist

The rimjoist connects your basement ceiling to the exterior walls. Because it’s at the edge of your home and interrupted by joists and pipes, it’s prone to tiny gaps. Spray foam insulation adheres tightly to every surface, expanding to fill cracks and crevices. When it cures, you’re left with an unbeatable foam seal that stops air infiltration cold.

Here’s why that matters:

  • Air infiltration at the rimjoist is one of the main sources of heat loss in older homes.
  • Moisture creeping in through gaps can cause rot and even mold growth.
  • Energy conservation is maximized when the rimjoist is sealed, reducing draftiness and ensuring your home’s temperature stays steady.

Spray foam is the only insulation that truly gets into the nooks and crannies around the rimjoist, making your home airtight from the ground up.

Data, Trends, and the Benefits of Proper Air Sealing

According to Natural Resources Canada, up to 35% of a home’s heat loss may come from air leaks—often focused around the foundation and rimjoist. The latest building codes across Alberta and elsewhere now require increasing attention to airtight homes, not only for comfort, but to meet community energy targets.

Surveys show that houses with a full foam seal can see their heating and cooling costs drop by 15-20% or more, thanks to reduced air infiltration. And, a properly insulated rimjoist significantly boosts indoor air quality by keeping out outdoor pollutants and humidity.

Foam Seal vs. Other Insulation Methods

It’s tempting to ask: Why not just use fiberglass or rigid board instead of spray foam? Here’s how they stack up for the rimjoist:

  • Fiberglass batts: Easy to install, but don’t block airflow. Gaps and compression can let cold air sneak by.
  • Rigid foam board: Better air sealing if caulked well—but it’s tricky to fit perfectly, especially around wires and pipes.
  • Spray foam insulation: Bonds directly to all surfaces, eliminating air gaps and thermal bridges. It provides a lasting, continuous foam seal, which is essential for truly airtight homes.

Customer feedback and industry studies consistently rank spray foam as the most effective option for rimjoist insulation and air tightness.

Challenges of Achieving True Air Tightness

Sealing a home isn’t always a simple weekend project. Diagnosing every point of air infiltration—especially at the rimjoist—takes a practiced eye. Spray foam must be installed precisely to guarantee a complete foam seal without costly gaps or thin spots.

While spray foam costs more upfront than fibreglass or board, the long-term savings on energy conservation and comfort quickly add up. Homeowners also appreciate improved soundproofing and fewer issues with condensation or pests. For a truly airtight home, professional installation is your best bet.

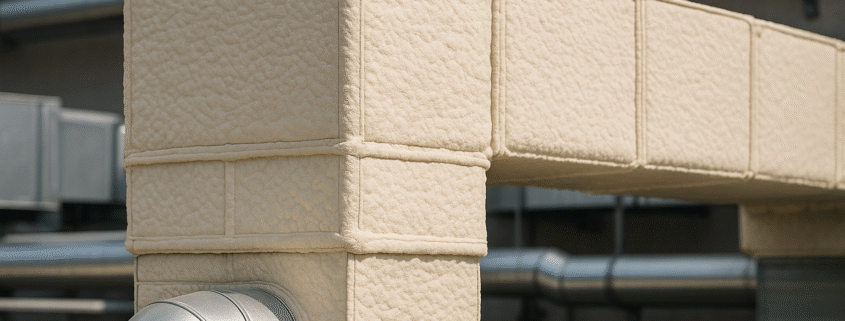
Future Outlook: Energy Conservation on the Rise

Climate goals and building codes will only get stricter. Advances in spray foam technology keep making airtight homes more attainable and affordable—even for challenging rimjoist areas. Expect to see more homes with sophisticated, closed-cell spray foam, which locks out air and moisture, helping Canadians fight rising energy costs and adapt to unpredictable weather.

Trusted companies like White Knight Contracting, in business since 2011, not only tackle insulation but offer total home exterior services—including siding—so you have one contractor for all your upgrade needs.

Step-by-Step: What to Expect with Rimjoist Spray Foam

  • Assessment: A pro will inspect your rimjoist for gaps, leaks, and other infiltration risks.
  • Prepping: Furniture and items are moved, and the area is protected with plastic sheets.
  • Foam Application: Specialist equipment sprays foam evenly into rimjoists, expanding to fill every space.
  • Curing: Foam hardens within hours, creating an instant, permanent foam seal.
  • Inspection: Experts double-check for airtightness and touch up if required.
  • Results: Enjoy more stable temperatures, fewer drafts, and lower energy bills almost immediately.

Interesting FAQ

DAP advises on attic spray foam applications including safety precautions and best practices.

  • Can spray foam in the rimjoist pay for itself? Most homeowners see payback on energy bills within five to seven years, thanks to drastic reductions in heat loss and air infiltration.
  • Is spray foam safe for people and pets? Yes—once cured, spray foam insulation is inert and safe for daily use.
  • Can one contractor handle spray foam plus other exterior needs? Yes, established contractors like White Knight Contracting can also install siding, windows, and more.
  • What makes the rimjoist so vulnerable? It’s where different building components meet, creating natural gaps that traditional insulations don’t block effectively.

To learn more and view our other blogs, click here.

Pool Demolition and Concrete Removal in Calgary: What's Involved and How Much It Costs

DIY concrete removal Calgary projects can look simple at first, but pool demolition adds weight, drainage, hauling, soil compaction, and safety issues that can surprise many homeowners. If you are planning pool removal Calgary work, White Knight Contracting can help with concrete removal, debris hauling, and related exterior work so you are not left trying to line up several trades for one messy job. In many cases, removing an old pool is not just about breaking concrete; it is about making the yard safe, level, usable, and ready for the next stage. That could mean a lawn, patio, garden, garage pad, or future landscaping. Because Calgary weather can shift fast, planning the job properly matters. The more you know going in, the easier it is to avoid delays, surprise fees, and poor backfill that settles later.

Table of Contents

History of Pool Demolition and Concrete Removal

Backyard pools were once seen as a major luxury feature, especially in larger suburban homes. Over time, many homeowners found that older pools became expensive to heat, repair, insure, and maintain. In Calgary, freeze-thaw weather also plays a big role because concrete expands and contracts as temperatures change. This can lead to cracking, shifting, and water leaks over the years. As a result, concrete pool demolition has become more common for people who want lower maintenance and more usable yard space. What used to be a rare project is now a practical choice for families who would rather have a patio, play area, garden, or parking space.

The history of concrete removal has also changed because machines and disposal rules are better understood now. Years ago, some pool owners simply punched holes in the bottom, buried broken concrete, and covered everything with soil. Today, many homeowners want a cleaner full removal because it can protect future landscaping and reduce settlement problems. A full removal means the concrete shell, rebar, plumbing, and debris are taken out instead of hidden underground. This method often costs more, but it gives the yard a stronger fresh start. It also helps if the property may be sold later, since buyers often ask what was done below the surface.

DIY concrete removal Calgary: What Is Really Involved?

DIY concrete removal Calgary work usually starts with a simple question: “Can I rent a jackhammer and do this myself?” For a small sidewalk slab, maybe. For a pool, the answer is usually more complicated. A concrete pool is thick, heavy, reinforced with steel rebar, and often surrounded by plumbing, decking, drains, and electrical lines. Concrete weighs about 150 pounds per cubic foot, which means even a small broken section can be hard to lift, move, and haul. Once the pool shell is broken apart, the debris must be loaded safely and taken to the right disposal site. That is where many DIY projects slow down.

The usual steps include draining the pool, checking for utilities, breaking the concrete, cutting rebar, removing debris, hauling material, backfilling, and compacting the soil. Backfilling means putting clean soil or gravel into the empty space. Compaction means pressing that material down in layers so it does not sink later. If this step is rushed, the yard can settle after rain or snowmelt. Think of it like packing a suitcase: if you just throw things in loosely, there will be empty spaces. A pool hole works the same way, except those empty spaces can become dips, cracks, or drainage problems.

Pool Demolition Cost in Calgary

Pool demolition cost depends on size, access, depth, concrete thickness, disposal fees, and whether you choose partial or full removal. A partial removal usually breaks the upper part of the pool, creates drainage holes, and fills the remaining shell. It may be cheaper, but it can limit future building options. A full removal takes out the pool shell and more debris, which is usually better if you want long-term flexibility. In Calgary, many homeowners should plan for a broad range, often from several thousand dollars to well over $15,000 for larger or harder-to-access pools. Very complex concrete pool demolition jobs can cost more when equipment access is tight or hauling distance is high.

Several items affect the final number. These include:

  • Pool size, depth, and concrete thickness
  • Whether the pool is indoors, outdoors, above ground, or in ground
  • Access for machines, bins, and trucks
  • Amount of rebar, tile, coping, and surrounding concrete
  • Backfill material and compaction needs
  • Landfill, hauling, and labour costs

For a real-world example, imagine two homes with the same pool size. One has a wide gate and room for a mini excavator. The other has a narrow side yard, mature trees, and no easy bin location. The second job can cost more because workers may need smaller machines, more hand labour, and extra time moving debris. That is why a site visit is often the best way to price the work.

One major trend in pool removal Calgary projects is turning old pool space into low-maintenance outdoor living areas. Many families are choosing patios, fire pit zones, artificial turf, garden beds, or open lawn instead of repairing an unused pool. This fits with a wider shift toward yards that are easier to care for and less costly to run. Pools can use a lot of water, energy, chemicals, and seasonal labour. By removing one, homeowners may lower ongoing maintenance and make the yard useful for more months of the year.

Another trend is cleaner disposal and better sorting of materials. Concrete, metal rebar, soil, and mixed debris may need different handling. Many contractors now plan disposal before demolition begins, which helps control cost and keeps the work site safer. Homeowners are also asking more questions about drainage after removal. This is smart because Calgary’s spring melt and summer storms can reveal low spots quickly. A well-planned removal should leave the yard graded so water moves away from the home, not toward the foundation.

Common Challenges With Concrete Pool Demolition

Concrete pool demolition can be noisy, dusty, and physically demanding. The first challenge is safety. Jackhammers, saws, excavators, and broken concrete edges can cause injuries if handled poorly. The second challenge is hidden utilities. Old pools may have electrical lines, gas lines for heaters, water lines, pumps, and drains nearby. Before digging or breaking concrete, these need to be located and handled properly. The third challenge is debris volume. A pool creates far more waste than many homeowners expect, and one bin may not be enough.

Weather is another big factor in Calgary. Frozen ground, heavy rain, or sudden snow can slow down removal and backfill. Wet soil can be harder to compact, while frozen soil can create settlement issues later. Access can also be tricky in older neighbourhoods where side yards are narrow. In those cases, smaller machines may be needed, and the work can take longer. This is why the cheapest quote is not always the best choice. A careful plan can save money by preventing repairs later.

Company Highlight

White Knight Contracting has been in business since 2011 and brings a practical, local approach to concrete removal and exterior property work. One key strength is that the team can handle many related tasks, like siding, without needing a second contractor for every part of the project. That matters when demolition affects nearby surfaces, access paths, exterior walls, or yard features. Their background in roofing, siding, eavestroughs, soffit work, hail damage repair, and concrete removal gives homeowners one point of contact for more than just breaking concrete. The company is also known for workmanship, customer service, and handling Calgary weather-related property issues. For homeowners, that can mean less stress, clearer planning, and fewer gaps between trades.

Future Prospects and What to Expect

The future of pool removal will likely focus on better equipment, smarter hauling, and more thoughtful yard reuse. Smaller machines are getting stronger, which helps on tight residential lots. More homeowners are also thinking about long-term value instead of short-term savings. For example, full removal may cost more today, but it can make the yard easier to landscape or build on later. In real estate, clear records of removal can also help answer buyer questions. If you are planning this type of project, take photos, keep receipts, and ask what material was used for backfill.

Before starting, homeowners should expect a few practical steps. First, get a site assessment. Second, compare partial and full removal. Third, ask how debris will be hauled and where it will go. Fourth, confirm how compaction will be done. Finally, plan what the space will become after the pool is gone. A good analogy is renovating a kitchen: demolition is only the first step. The finished result depends on what happens after the mess is removed.

FAQ

When budgeting for pool demolition and concrete removal, homeowners should remember that large concrete loads in Calgary must be taken to a City landfill, where disposal charges apply, which is why hauling and landfill fees can affect the final project cost.

Q&A

Question

What does pool demolition and concrete removal in Calgary actually involve?

Answer

Pool demolition in Calgary involves draining, breaking the shell, removing concrete debris, backfilling, and compacting. For many full removal projects, the process typically takes 3–5 days, depending on weather, access, pool size, and disposal needs.

Question

How long does pool demolition and concrete removal take in Calgary?

Answer

Pool demolition in Calgary typically takes 3–5 days for a full removal including backfill and compaction, weather and access permitting. Larger pools, tight access, extra concrete, or poor weather can add time.

To learn more and view our other blogs, click here,

Conclusion

Pool demolition and concrete removal can open up a yard, lower maintenance, and make outdoor space more useful. While DIY concrete removal Calgary projects may work for small slabs, pools are usually a different level of work because of weight, rebar, hauling, backfill, and compaction. The best approach is to understand the full process, compare removal methods, and plan for disposal and site finishing from the start. With the right crew and a clear plan, an old pool can become a safe, level space ready for something new.

The photo used in this blog are for demonstration purposes only.

Thermal Bridging Solutions Spray Foam

Introduction

The strength that spray foam insulation offers is transforming the way homeowners approach thermal bridging fixes and energy leaks in their properties. When working with a company like White Knight Contracting, you can access innovative foam insulation solutions that deliver superior heat loss prevention and comfort year-round.

Table of Contents

Thermal bridging has always been a challenge in construction. Traditionally, builders used batt insulation, fiberglass, and rigid foam boards, which often left cold spots and caused inefficient energy leaks. The need for stronger thermal bridging fixes led researchers to develop innovative approaches, such as continuous insulation systems and advanced spray foam applications.

Now, the building industry is witnessing a trend toward closed-cell spray foam insulation. This solution not only fills small cracks and gaps but also provides an unmatched air-tight seal, reducing heat loss and maximizing energy efficiency. As homes become more airtight, control over indoor climate improves, and utility bills drop noticeably.

Understanding Thermal Bridging and Energy Leaks

Thermal bridging happens when a material—like wood or steel—transfers heat much faster than the surrounding insulation. These “bridges” form weak points in walls, roofs, or floors. Warm air escapes in winter, while summer heat seeps in, forcing your HVAC system to work overtime. This is where effective thermal bridging fixes are essential.

  • Thermal bridge: A spot in the building envelope where heat transfers rapidly, causing energy leaks.
  • Spray foam insulation: Expands on contact, eliminating gaps and creating a thermal barrier against heat loss.

Modern spray foam insulation solutions directly address these weak spots, ensuring continuous coverage and lasting comfort.

Current Challenges with Conventional Insulation

Traditional methods like fiberglass and batt insulation are prone to compression, gaps, and settling over time. This leads to recurring issues with energy leaks and makes it difficult to guarantee long-term performance. In older homes, contractors often discover cold patches or drafts that indicate missed spots or failing insulation.

The limitations are clear:

  • Poor coverage in corners or around penetrations
  • Difficulty controlling air and moisture movement
  • Reduced R-values as insulation ages

For many property owners, tackling these challenges head-on with advanced foam insulation solutions is the only way to secure year-round heat loss prevention.

Why Spray Foam is the Gold Standard for Heat Loss Prevention

Spray foam insulation is widely recognized for its strength and ability to solve thermal bridging issues more effectively than other products. Here’s why:

  • Expands into every nook, eliminating gaps
  • Forms a continuous air and moisture barrier
  • Superior R-value per inch, boosting thermal resistance
  • Prevents mold, dust, and allergen intrusion
  • Reduces external noise, improving indoor comfort

The precision with which spray foam addresses energy leaks and thermal bridging fixes is what makes it the top choice for new and retrofit projects.

Real-World Examples of Foam Insulation Solutions

Consider a family living in a 1970s Calgary bungalow. The original batt insulation had deteriorated, and rooms never felt warm in winter. After replacing it with closed-cell spray foam, their utility bills dropped nearly 30%, and cold corners became a thing of the past. In another case, a renovated basement suffered from condensation and moisture buildup until spray foam sealed the rim joists, eliminating drafts and potential mold growth.

White Knight Contracting has helped many clients with these foam insulation solutions, offering more than a decade of experience—including projects combining insulation, siding, and even exterior upgrades—without the need to hire multiple contractors.

Future Prospects: Where Spray Foam Insulation is Heading

As energy codes evolve, the focus on airtight, energy-efficient homes and commercial properties intensifies. Spray foam is positioned to lead as more building owners seek cutting-edge thermal bridging fixes and heat loss prevention methods. New technology in the pipeline includes eco-friendly, low-VOC foams and smart insulation systems that adapt to seasonality and occupancy needs.

Alongside product innovations, expect to see stricter standards and installation protocols, ensuring homeowners receive the full benefits of professionally applied spray foam insulation solutions.

Interesting FAQ

Building Science Corporation releases detailed spray foam installation protocols for residential construction.

  • How does spray foam actually prevent heat loss?
    It expands on contact to fill cracks and gaps, creating an unbroken thermal and air barrier that stops energy leaks before they start.
  • Are there differences between open-cell and closed-cell spray foam?
    Yes, closed-cell is denser and better for moisture and heat loss prevention, while open-cell allows for some breathability and sound dampening.
  • Can spray foam be installed in existing homes?
    Absolutely. Retrofits are common, and professional contractors can safely upgrade old insulation with minimal disruption.
  • What other services can the contractor handle?
    Since 2011, White Knight Contracting has taken care of insulation, siding, and more, often completing comprehensive upgrades without needing a second contractor on the job.

Explore More

To learn more and view our other blogs, click here.

DIY Concrete Removal vs. Hiring a Pro in Calgary: A Realistic Cost & Risk Comparison

Concrete removal Calgary projects can look simple at first, especially when it is “just” an old patio, walkway, or driveway edge, but the real cost often shows up after the first crack. Many homeowners compare DIY work with White Knight Contracting because they want to save money without creating bigger problems. A small slab may be manageable with the right tools, safety gear, and disposal plan. However, concrete is heavy, dusty, noisy, and sometimes tied to drainage, landscaping, siding, steps, or buried utilities. That means the cheapest option on paper is not always the safest or most affordable option in real life. In this guide, we will compare DIY concrete breaking with hiring a professional so Calgary homeowners can make a clear, practical choice.

Table of Contents

History: Why Concrete Removal Became More Common in Calgary

Calgary has many homes with older driveways, patios, sidewalks, and garage pads that have been through years of freeze-thaw cycles. When water gets into small cracks and freezes, it expands, making the cracks wider over time. Add vehicle weight, shifting soil, poor drainage, and hail-related exterior repairs, and concrete can start to sink, break, or pull away from the home. In the past, many homeowners patched cracks and hoped the slab would last a few more seasons. Today, more people remove damaged concrete fully because new landscaping, drainage upgrades, basement work, and exterior renovations often need a clean starting point.

Another reason concrete removal is more common is that homeowners are more aware of long-term water damage. A cracked walkway sloping toward the foundation may seem minor, but it can guide rain and snowmelt toward the house. Over time, that can lead to damp basements, soil movement, or damage to nearby exterior materials. In a real-world example, a homeowner replacing siding may also discover that a side walkway is pushing water toward the wall. In that case, removing and regrading the concrete is not just cosmetic. It is part of protecting the home.

Concrete removal Calgary: DIY Cost vs. Professional Cost

DIY concrete removal Calgary costs usually start with tool rental. A homeowner may need a jackhammer, concrete saw, pry bars, wheelbarrow, sledgehammer, dust mask or respirator, gloves, hearing protection, eye protection, and a trailer or bin. Tool rentals can add up quickly, especially if the slab is thicker than expected or if the job takes more than one day. Disposal is another cost that people often forget. Concrete is heavy, and a 10-by-10-foot slab that is 4 inches thick can weigh around 1.5 tons, depending on reinforcement and moisture.

Professional concrete removal costs more upfront because labour, tools, hauling, safety planning, and disposal are included. However, that higher upfront cost can reduce surprise expenses. Professionals can usually break, load, and remove concrete faster because they use the right equipment from the start. They can also help avoid damage to nearby surfaces, fences, steps, landscaping, siding, and drainage areas. DIY may save on labour, but it can become expensive if the job causes damage or takes several days longer than planned.

Concrete Removal Risks Calgary Homeowners Should Know

Concrete removal risks Calgary homeowners face are not only about sore backs or broken tools. The biggest risks include injury, dust exposure, flying debris, noise damage, improper disposal, and accidental damage to underground utilities. A jackhammer can kick back, concrete pieces can shift suddenly, and sharp edges can cut through gloves or boots. If the slab has rebar or wire mesh inside, breaking it apart becomes slower and more dangerous. This is why safety gear is not optional. At minimum, homeowners need eye protection, hearing protection, strong gloves, steel-toe footwear, and a properly fitted respirator when dust is present.

Silica dust is one of the most serious concerns. Silica is a mineral found in materials like concrete, stone, sand, and mortar. When concrete is cut, crushed, drilled, or ground, tiny dust particles can enter the air and be breathed deep into the lungs. According to OSHA, “Materials like sand, stone, concrete, and mortar contain crystalline silica.” This matters because exposure can lead to serious lung disease over time. Water control, dust collection, and respirators help lower risk, but they must be used correctly.

One major trend is the move toward cleaner, more controlled concrete removal. Instead of simply smashing a slab into random pieces, professionals often plan cuts, break points, hauling routes, and disposal steps before starting. Wet cutting and dust control systems are also more common now, especially when concrete is close to doors, windows, neighbours, or air intakes. This is a big shift from the old approach of “break it up and figure it out later.”

Another trend is better recycling. In many cases, clean concrete can be recycled and used as aggregate, which means crushed material for future construction use. This can reduce waste compared with sending everything to landfill. Homeowners doing DIY concrete breaking may not know where to take concrete or what materials are allowed. For example, concrete mixed with soil, wood, asphalt, or garbage may be treated differently than clean concrete. A professional concrete removal crew is more likely to understand sorting, loading, and disposal rules before the truck leaves the property.

Challenges: Where DIY Concrete Breaking Gets Hard

The first challenge is slab thickness. Many homeowners assume a patio or walkway is 3 or 4 inches thick, but some areas may be much thicker near edges, steps, garage transitions, or old repairs. A thin-looking driveway section can include wire mesh, rebar, or an extra base layer that slows the job down. This is like trying to cut a sandwich and finding a metal plate inside. The outside looks simple, but the hidden layer changes everything.

The second challenge is access. If the concrete is in a backyard with a narrow gate, stairs, soft soil, or finished landscaping, hauling broken pieces becomes slow and tiring. A wheelbarrow full of concrete is very heavy, and repeated trips can damage grass, garden beds, and pathways. The third challenge is what sits under or beside the concrete. Irrigation lines, gas lines, electrical lines, drainage pipes, and downspout extensions can be close to slabs. Before breaking concrete, homeowners should always arrange utility locates and check drainage paths.

Company Highlight

White Knight Contracting has been in business since 2011 and brings a practical advantage to concrete removal projects because they understand more than one part of the home exterior. Their team can handle many related tasks, including siding, roofing, eavestroughs, soffit work, and hail damage repairs, without homeowners needing to find a second contractor for every connected issue. That is helpful when concrete removal is part of a larger project, such as fixing drainage near a wall, replacing damaged exterior materials, or preparing for a cleaner outdoor space.

Their strengths include pride in workmanship, strong customer service, quality products, and experience with Calgary homes and weather conditions. They are also known for handling storm and hail-related exterior repairs, which matters in a city where weather can affect both concrete and the surfaces around it. When one contractor can look at the bigger picture, the project is less likely to create gaps between trades. For example, if old concrete is removed near siding, the crew can better plan around wall protection, water flow, and finishing details.

Future Prospects: What to Expect Before You Start

In the future, homeowners can expect concrete removal to become more planned, safer, and more focused on proper disposal. More people are asking about dust control, recycling, and drainage before starting a project. That is a good thing because removing concrete is often the first step toward a better outdoor space, not the final goal. If you are planning new landscaping, a replacement walkway, a garage pad repair, or better water flow, think beyond demolition. Ask what happens after the concrete is gone.

Before choosing DIY or professional concrete removal, take a few practical steps. Measure the area, look for cracks that show possible thickness, check access for hauling, and think about where the broken concrete will go. Also, check whether the slab is close to gas meters, downspouts, foundation walls, fences, or finished siding. If the job is small, open, thin, and easy to haul, DIY may be reasonable for a careful homeowner. If the slab is large, reinforced, close to the home, or difficult to access, hiring a pro is usually the smarter choice.

FAQ

DIY concrete removal can carry more risk than many homeowners expect, because cutting, grinding, drilling, or crushing concrete can release respirable crystalline silica dust. Respirable means the dust particles are small enough to be breathed deep into the lungs. This is why dust control, water use, proper masks, and safe work habits matter on any concrete removal job.

Q&A

Question

Is it cheaper and safer to remove concrete yourself or hire a Calgary pro?

Answer

DIY saves on labour but risks injury, tool rental costs, improper disposal fees, and potential damage to underground utilities or drainage. For small, simple slabs, a careful homeowner may save money. For larger slabs, reinforced concrete, tight spaces, or areas near the home, professional concrete removal is often safer and more predictable.

Question

What DIY concrete removal mistakes do Calgary homeowners most commonly make?

Answer

The most common mistakes are underestimating slab thickness, hitting underground utilities, improper disposal, and using inadequate tools that crack surrounding surfaces. Homeowners also often forget how heavy broken concrete is and how long hauling can take. Planning disposal, access, safety gear, and utility locates before starting can prevent many of these problems.

To learn more and view our other blogs, click here,

Conclusion

DIY concrete breaking can make sense when the slab is small, thin, easy to reach, and far from important home systems. However, concrete removal Calgary projects often come with hidden costs and risks, including dust, tool rentals, disposal, heavy lifting, and possible damage to utilities or drainage. Professional concrete removal costs more at the start, but it can save time, reduce safety concerns, and help prevent expensive mistakes. The best choice depends on the size of the slab, the location, your experience, and how much risk you are willing to take. When in doubt, get a professional opinion before swinging the first hammer.

The photo used in this blog are for demonstration purposes only.

Improve Commercial HVAC Insulation Efficiency

Introduction

Focusing on the durability of your commercial HVAC system’s insulation is essential for improving HVAC efficiency, energy savings, and comfortable temperature regulation throughout your property. At White Knight Contracting, providing top-tier insulation solutions is our specialty, ensuring your business benefits from advanced, long-lasting protection.

Table of Contents

The History of Commercial HVAC Insulation

Commercial HVAC insulation has come a long way since the early days, where materials like sawdust and cotton were used primarily to prevent heat loss. As businesses and buildings grew, so did the need for improved temperature regulation and higher HVAC efficiency. By the mid-20th century, fiberglass and foam-based insulation had become the standard thanks to their improved durability and effectiveness.

As demand for energy conservation became more prominent, industry professionals started to focus not just on temperature control but also on techniques to cut energy bills and boost system life. These upgrades have shaped how insulation plays a major role in a property’s overall performance today.

Modern commercial HVAC insulation emphasizes both durability and sustainability. There is a growing shift towards materials like closed-cell spray foam and advanced fiberglass due to their ability to seal ductwork more tightly and block thermal bridges. Businesses now expect insulation solutions that maintain high HVAC efficiency, optimize temperature regulation, and last for years without frequent maintenance.

  • Eco-friendly insulation options are gaining traction.
  • Smart sensor integration allows for real-time efficiency monitoring.
  • Energy audits highlight the impact of proper duct insulation in reducing utility costs.

For property managers, investing in upgraded commercial HVAC insulation means fewer surprises, lower repair costs, and an overall smoother operation.

Common Challenges in Commercial HVAC Insulation

While technology has improved, certain issues still challenge commercial HVAC insulation efforts:

  • Air leaks from poor duct insulation lead to uneven temperature regulation and energy waste.
  • Moisture infiltration can weaken insulation’s durability, causing mold and indoor air quality issues.
  • Maintenance is often overlooked, allowing small problems to snowball into major efficiency losses.
  • Retrofitting older buildings can mean navigating outdated materials and tight crawlspaces.

Professional installation and routine inspections by experienced contractors can address these problems before they impact comfort or the bottom line.

Future Prospects for Temperature Regulation and Efficiency

The future of commercial HVAC insulation looks bright, especially with innovations focused on maximizing durability and system performance. Some breakthroughs on the horizon include:

  • Biosourced and recycled materials for more sustainable construction.
  • Self-healing insulation capable of repairing minor damage automatically.
  • Increased use of AI to predict insulation wear and necessary upgrades for optimal HVAC efficiency.

These advancements are expected to set new standards for how commercial spaces regulate temperature and minimize energy waste, helping your property achieve peak performance while lowering costs.

Step-by-Step Guide: Maximizing Insulation Durability

Improving commercial HVAC insulation requires attention to detail and following best practices for lasting durability and efficiency. Here’s what you can expect from a quality installation:

  1. Assessment: A thorough review of existing duct insulation and trouble spots to determine the right solutions.
  2. Preparation: Cleaning ducts and removing debris to ensure a smooth surface for insulation material.
  3. Material Selection: Choosing the right type and thickness for spray foam, fiberglass, or other recommended insulation based on building needs.
  4. Application: Expert installation in critical areas, such as around ductwork, joints, and any zones exposed to temperature extremes.
  5. Sealing: Applying vapor barriers or additional sealing tape, especially where condensation might pose a risk.
  6. Inspection: Post-installation checks guarantee complete coverage and compliance with fire and safety codes.

Routine follow-ups keep the insulation in top condition, preventing expensive fixes down the road.

Comparing Insulation Methods for Commercial HVAC

Each insulation method for commercial HVAC systems has distinct benefits and applications. Here’s a quick breakdown:

  • Closed-Cell Foam: Superior at air sealing and moisture resistance, resulting in long-term durability and high HVAC efficiency.
  • Fiberglass Batts: Cost-effective, but may be less airtight, so careful installation is critical for effective temperature regulation.
  • Rigid Board: Great for areas needing extra thermal resistance, though installation can be complex in tight spaces.

Choosing the best method often comes down to your building’s needs, budget, and local climate conditions. In many cases, combining different materials in strategic locations delivers the highest return on investment.

Interesting FAQ

VB Insulation describes installation techniques for maximizing spray foam performance and coverage.

  • What are the signs that my commercial HVAC insulation needs upgrading?
    Uneven temperatures, rising utility bills, and visible damage or moisture near ducts are key indicators that your insulation may be failing.
  • How often should commercial duct insulation be inspected?
    Most experts recommend annual check-ups, with additional inspections after any major building renovations or severe weather events.
  • Can upgrading insulation really lower energy costs?
    Absolutely—studies show that proper HVAC insulation can reduce energy use by 15–30%, depending on system age and building size.
  • Is it possible to upgrade insulation in an older commercial property?
    Yes, modern solutions like spray foam can often be retrofitted, even in challenging spaces, without major disruption to your business.
  • Why hire a single contractor for multiple upgrades?
    White Knight Contracting has been in business since 2011 and can handle not just your HVAC efficiency needs, but also related work like siding—saving you time and keeping your project under one roof.

Find Us on Google Maps

Conclusion

Maximizing the durability of your commercial HVAC insulation doesn’t just keep your property comfortable—it can lead to long-term savings and help your building run at peak performance. Investing in professional insulation and regular maintenance is one of the smartest moves for modern property owners. To learn more and view our other blogs, click here.